The electrical charge and mild acid oxidize the surface of the aluminum, forming
microscopic crystals of aluminum oxide. This oxide surface is very hard, much harder
than the base material, but very thin, often only a thousandth of an inch. While
most aluminums average about 35 to 40 on the Rockwell C scale, the oxide layer is
closer to 52 to 55. A file, usually very hard steel, is often 55 to 58 Rockwell C.
Most automotive-grade ("wet & dry") sandpapers use aluminum oxide grains
as the abrasive. The anodizing prevents further oxidation, so the piece wont rust
or corrode any further, and also makes the surface much more wear and scratch resistant.
The
anodic layer is also very porous as it comes out of the bath. Because of this porosity,
it will absorb and hold dyes and colors well. The piece is usually colored simply
by dipping it in a vat of concentrated dye for several minutes. Once the piece has
been dyed, it is sealed, simply by immersing it in clean, boiling water for several
more minutes. This process, because of the porosity of the oxide, hydrates the crystalline
layer, which swells the oxide, closing the pores, sealing the dye within. Because
the layer is so thin, the dye must be heavily concentrated, and even then, the color
will be somewhat translucent. This is what gives the color anodizing its characteristic
metallic sheen; the shiny base aluminum shows through the color. Because of this
semi-transparency, the piece cannot be anodized white; the aluminum would show through,
giving a light grey color.
"Splash" or "sponge" patterns
are made by first literally slinging a "masking" agent onto the anodized
surface, before it is dyed. This prevents the masked areas from accepting the color,
so when the mask is removed, silver streaks are revealed underneath. A thickened
dye itself can also be 'splashed' or 'sponged' onto the surface, then the part is
dyed. Often, the first dye is a much darker color, which leaves, for example, black
streaks on a green surface.
A "fade" color can be made by first dying/splashing/sponging
the part, then before sealing, the piece is partially lowered into a mild bleach
or acid solution, that dilutes or "fades" the dye, just like liquid bleach
can fade a pair of pants in the wash. A fade job will, if left in long enough, show
a 'clear' or silver color where it spent the most time in the 'fade bath', which
slowly darkens to, for example, a light blue where it wasn't in the bath as long,
to a medium blue where it was in only briefly, to a deep blue where it was not "faded"
at all.
The color you see on the piece is the dye, not technically the anodizing. The
piece can be anodized, but not dyed, (for a shiny silver color) but it cannot be
dyed without anodizing.
The anodic layer can and usually does change the
dimensions of the part being anodized. The addition of oxygen to the surface layer
makes it thicker, usually adding a half-thousandth or more to the measurement. This
doesnt sound like much, but it can make a difference in some finely fit pieces. When
a piece is reanodized, like after its been milled and you are having it recolored,
or youre changing the dull factory black for a cool splash, the original layer of
anodizing must be completely removed down the the unoxidized layer of aluminum beneath.
Multiple stripping/reanodizing processes can remove a surprising amount of metal,
to the point O-rings might not seal as well, and parts become loose. For example,
stripping and reanodizing an aluminum barrel can alter the bore diameter by up to
two or three thousandths. Meaning your .688 could become a .691.
Now, there
are home methods to anodize aluminum, and one company even sells an anodizing kit.
However, I have tried several home recipes, and my results have been poor. I do know
people
who have successfully anodized pieces themselves, and dont let me discourage
you from trying, but remember, you will most likely spend more money on materials
trying to do it yourself, than you would have having a professional plater do the
job. Also, home results tend to be fairly low quality, so if youre expecting to do
a fancy, shiny splash job, dont bother.
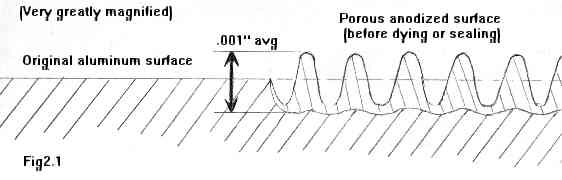
In Figure 2.1 above, we see the original, unanodized aluminum surface on the left, and a greatly magnified diagram of the anodized surface on the right. You can see how the crystals 'grow' out of the surface of the base metal, partially above and partially below the original surface level. This oxide layer is usually about one thousandth of an inch thick, although it can be up to two thousandths. The layer is very dificult to make thicker than that, as the oxide is non-conductive, so once the electrical path through the base metal from the electrolyte is lost, the formation of the layer stops.
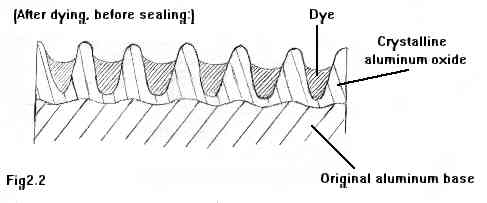
In Figure 2.2 above, we see the same anodized layer, after the dye bath. The dye fills the microscopic pores, giving the metal the chosen color. Remember, we're looking at a layer a thousandth of an inch thick, much thinner than even a sheet of paper. The pores are not so much filled with "liquid" dye, rather the very finely-ground dye colorants. Picture the pores as pits filled with "sand grains" instead, with the 'sand' actually bits of the actual pigment elements of the dye.
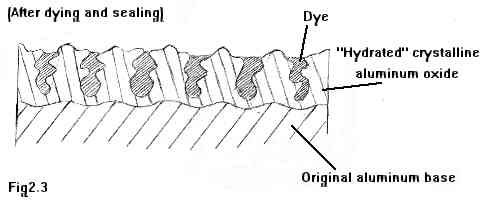
And finally, here in Figure 2.3, above, we see the surface 'sealed' to trap the dye. Sealing is done by merely boiling the part for a few minutes in clean water. The oxide crystals react with the boiling water by "swelling" and forming smaller crystal nodules, which grab and hold the pigment grains of dye in the pores. So even after washing and drying, the pigment grains are held fast, much like gravel is held in a cement slab.